 Glass Image Tools
Help
Everything Glass Image Tools does, where to find it, and what to try when it doesn’t do what you expected. You don’t need to read it in order.
Getting it
Mac
Download Glass Image Tools 1.0 for Mac (macOS 26 or later; Apple silicon and Intel). Open the disk image and drag Glass Image Tools into Applications. The app is Developer ID signed, notarized by Apple and stapled for Gatekeeper. It runs in the App Sandbox.
Prefer an archive? Download the ZIP. SHA-256 checksums and release notes accompany both downloads. To build it yourself, select GlassImageToolsMac → My Mac in Xcode; the README includes commands.
Apple Vision Pro
The Vision Pro app isn’t on TestFlight or the App Store yet. Build it with Xcode and install it on your headset:
- On a Mac, install Xcode 27 with the visionOS SDK. Glass Image Tools is developed with Xcode 27.2.
- Get the source:
git clone https://github.com/msitarzewski/GlassImageTools, or Code → Download ZIP on GitHub. - Create a file named
Config/Identity.local.xcconfigwith your own signing team and a bundle identifier nobody else uses:
Xcode shows your team ID under Settings → Accounts. This file is ignored by Git, so it stays yours.DEVELOPMENT_TEAM = YOURTEAMID VISIONSNIP_BUNDLE_ID = com.yourname.glassimagetools - Open
GlassImageTools.xcodeproj, choose the GlassImageTools scheme and your paired Vision Pro (with Developer Mode on), and choose Product → Run.
A free Apple Account can install your own builds, but Apple makes them expire after seven days; run it from Xcode again to renew. A paid Apple Developer Program membership makes them last a year. The README has the command-line version.
Taking the screenshot
Glass Image Tools edits screenshots; it doesn’t take them. On Mac, use ⇧⌘3 or ⇧⌘4 and open or paste the result. On Vision Pro, press the top button and the Digital Crown at the same time, or ask Siri to take a screenshot. visionOS saves it to Photos.
Opening an image
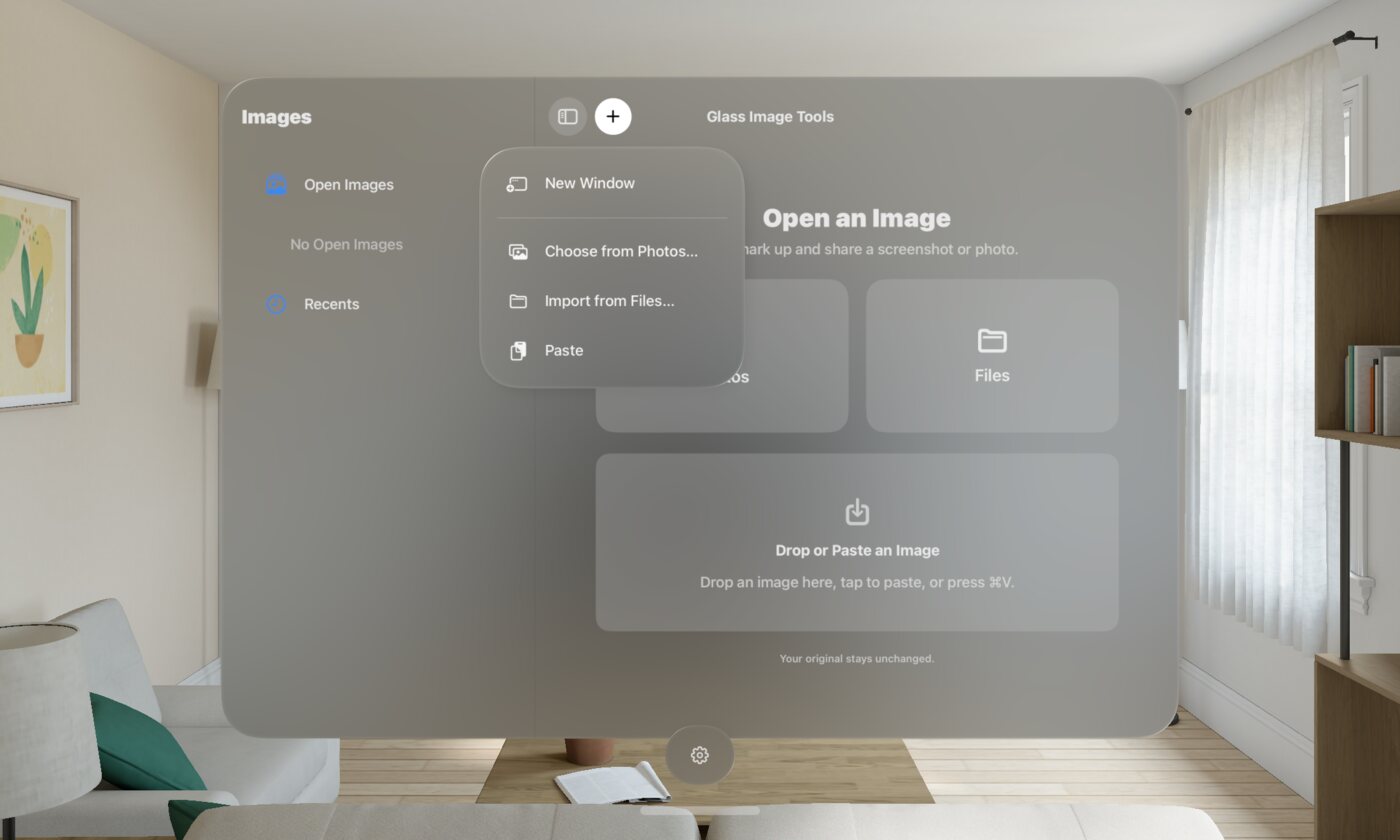
An empty window has large Photos and Files choices and a drop/Paste well. Drop an image into the well, tap it to paste, or press ⌘V there. Apple may ask before pasting content from another app. Once an image is open, the + button at the top left has the same choices, plus New Window:
- Choose from Photos… opens Apple’s photo picker. The app receives only the photo you pick, and needs no permission to read your library.
- Import from Files… opens Apple’s file browser, for any image file visionOS can read, such as PNG, JPEG and HEIC.
- Paste opens the image on the clipboard. It’s greyed out when the clipboard has no image.
- New Window opens a second, separate editor window.
Paste a direct image link. Copy one HTTPS URL to an image, then use the same Paste action, empty-window tap or ⌘V. The app downloads the image and opens a new document. A URL copied as plain text works too. Webpage links and login-protected images may fail; copy the image itself in your browser instead. HTTP, file and data links are not downloaded. The download can be cancelled and uses the normal image limits. The image host sees your IP address and requested URL; no cookies, saved credentials or existing image are sent. Privacy details.
Opening another image adds it to the same window, beside the ones already open; nothing you were working on is replaced. Files up to 256 MiB and images up to 200 megapixels open; Vision Pro screenshots are far smaller.
Cropping
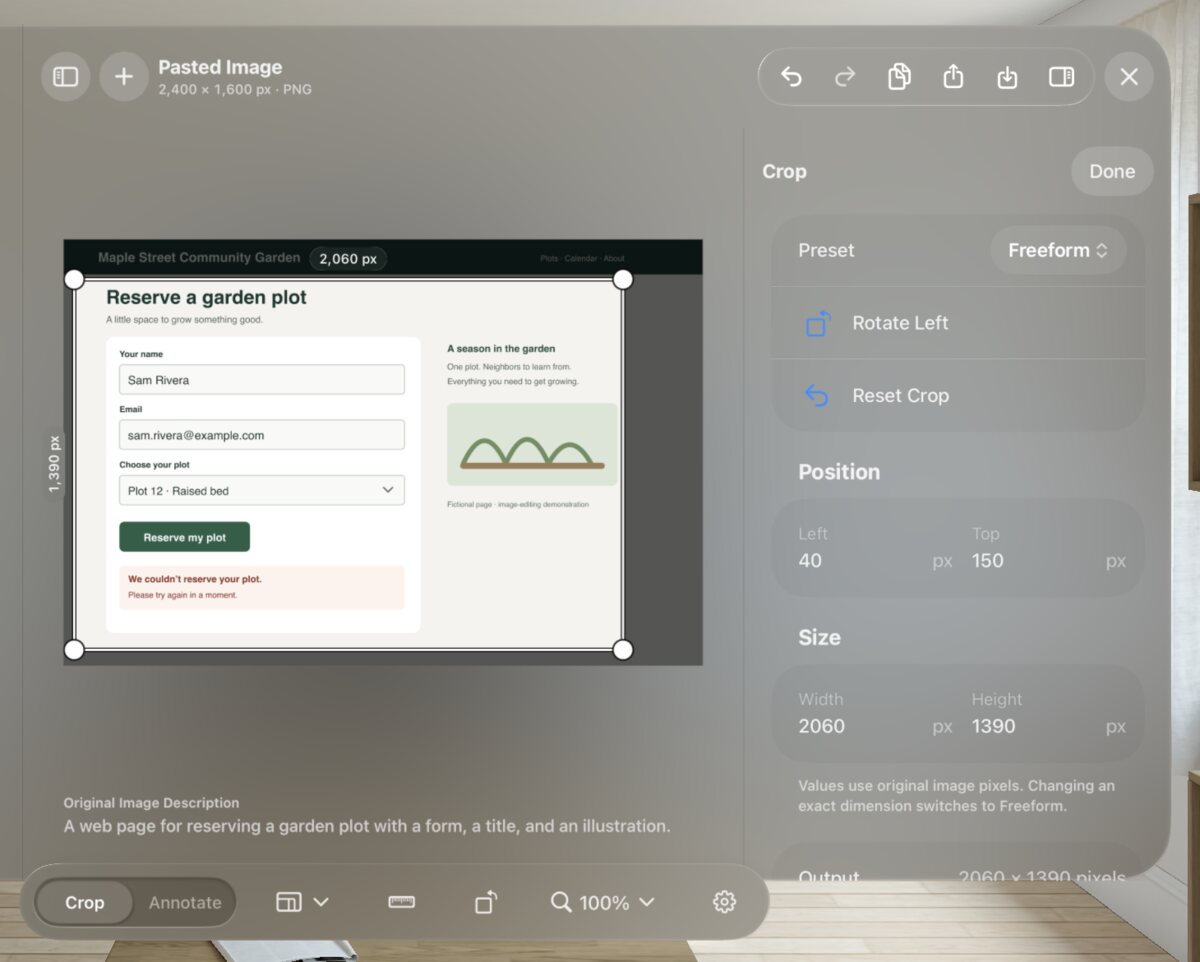
New images open in Crop (the switch in the bottom toolbar). Drag a corner handle to resize the crop, or drag inside it to move it. The width and height show along its edges, in the original image’s pixels, and everything outside is dimmed.
- Crop Preset (in the bottom toolbar): Freeform, 1:1, 16:9 or 4:3, and Reset Crop.
- Crop Dimensions (the ruler) opens exact Left, Top, Width and Height fields. Typing a size switches to Freeform.
- Rotate Left turns the image 90° counterclockwise.
- The magnifier shows the zoom, from 100% up to 800%. Pinch on the image to zoom where you pinch; the menu also has Pan and Fit to Window.
The crop is always taken from the full-resolution original, however far you’re zoomed.
Marking it up
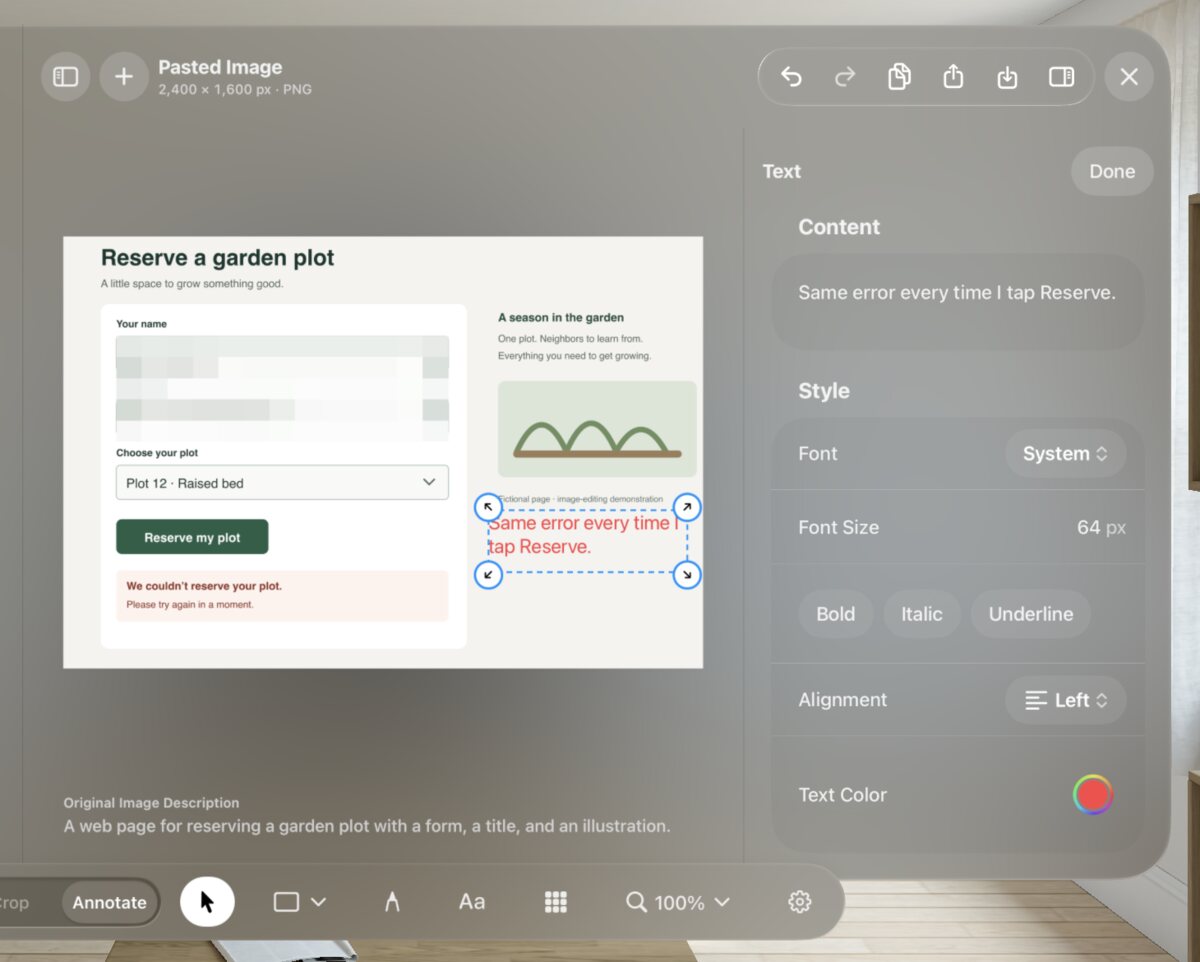
Switch to Annotate in the bottom toolbar. The tools appear beside the switch:
- Shapes: rectangle, rounded rectangle, ellipse, triangle, speech bubble, line and arrow. Choose one, then drag on the image.
- Draw: drag to draw freehand.
- Text and Pixelate add a new object in the middle of the crop straight away, ready to move and edit.
- Select (the pointer): tap an object to select it, drag it to move it, drag its handles to resize it. Pinch and hold an object for its own menu: Edit Text (for text), Reveal Selection, Duplicate, Bring to Front, Send to Back and Delete Annotation.
The inspector on the right shows the selected object: its words, font, size, bold, italic and underline for text; color, stroke width (1 to 80 pixels) and fill for shapes; block size for Pixelate; and its exact position and size. The sidebar button at the right end of the top tools shows and hides it. Undo and Redo are at the top. What you change in the inspector before choosing Done undoes in one step.
Everything stays editable until you close the image, including after you Copy or Save.
Hiding things with Pixelate
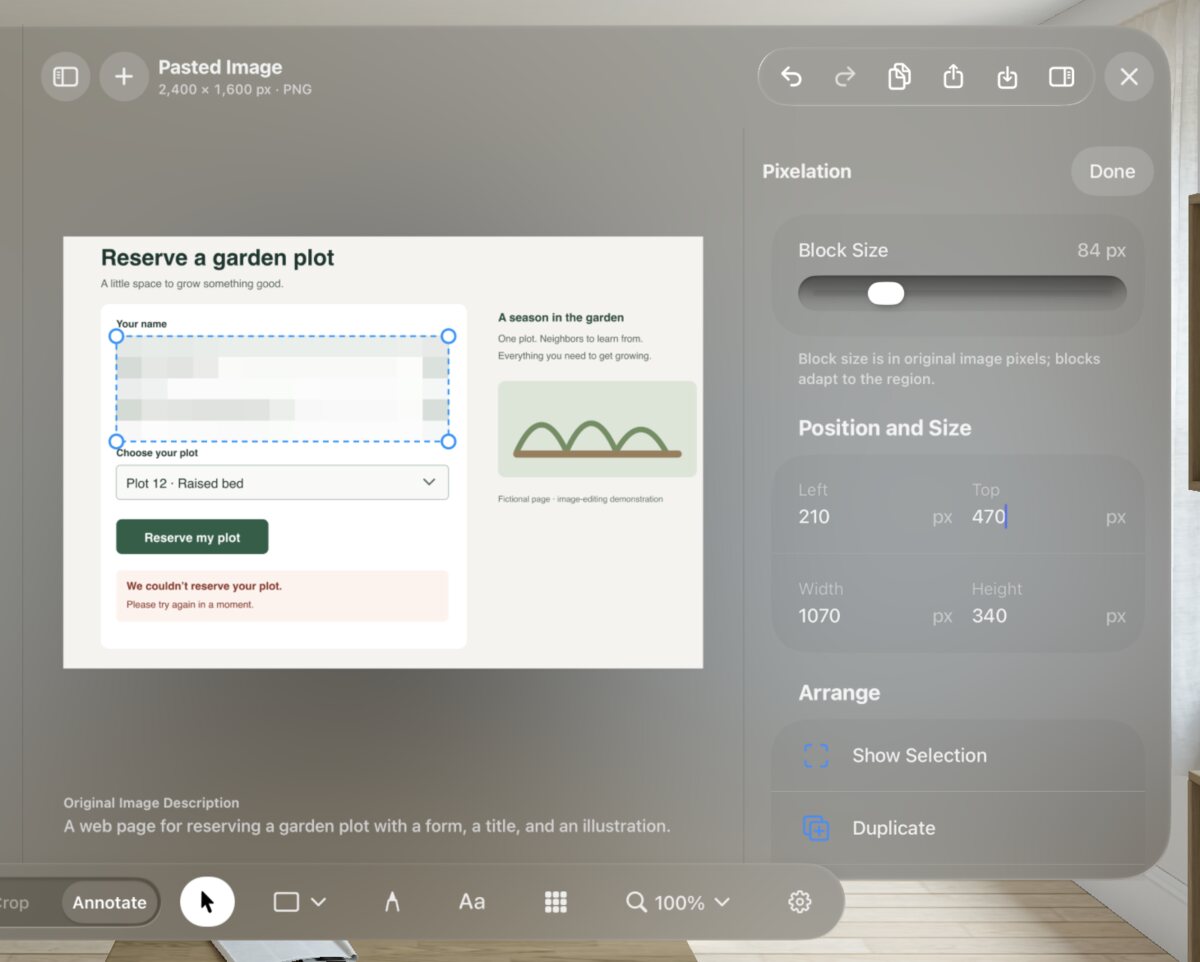
Add Pixelate, then move and resize it over what you want hidden. The inspector’s Block Size sets how large the blocks are, from 16 to 320 pixels. In the new image, the area is redrawn from those blocks, so the detail underneath isn’t in it. Each block is still an average of what was there, so larger blocks hide more; for anything that really matters, crop it out instead. Your original is unchanged. More on this in Privacy.
Copy, Share and Save
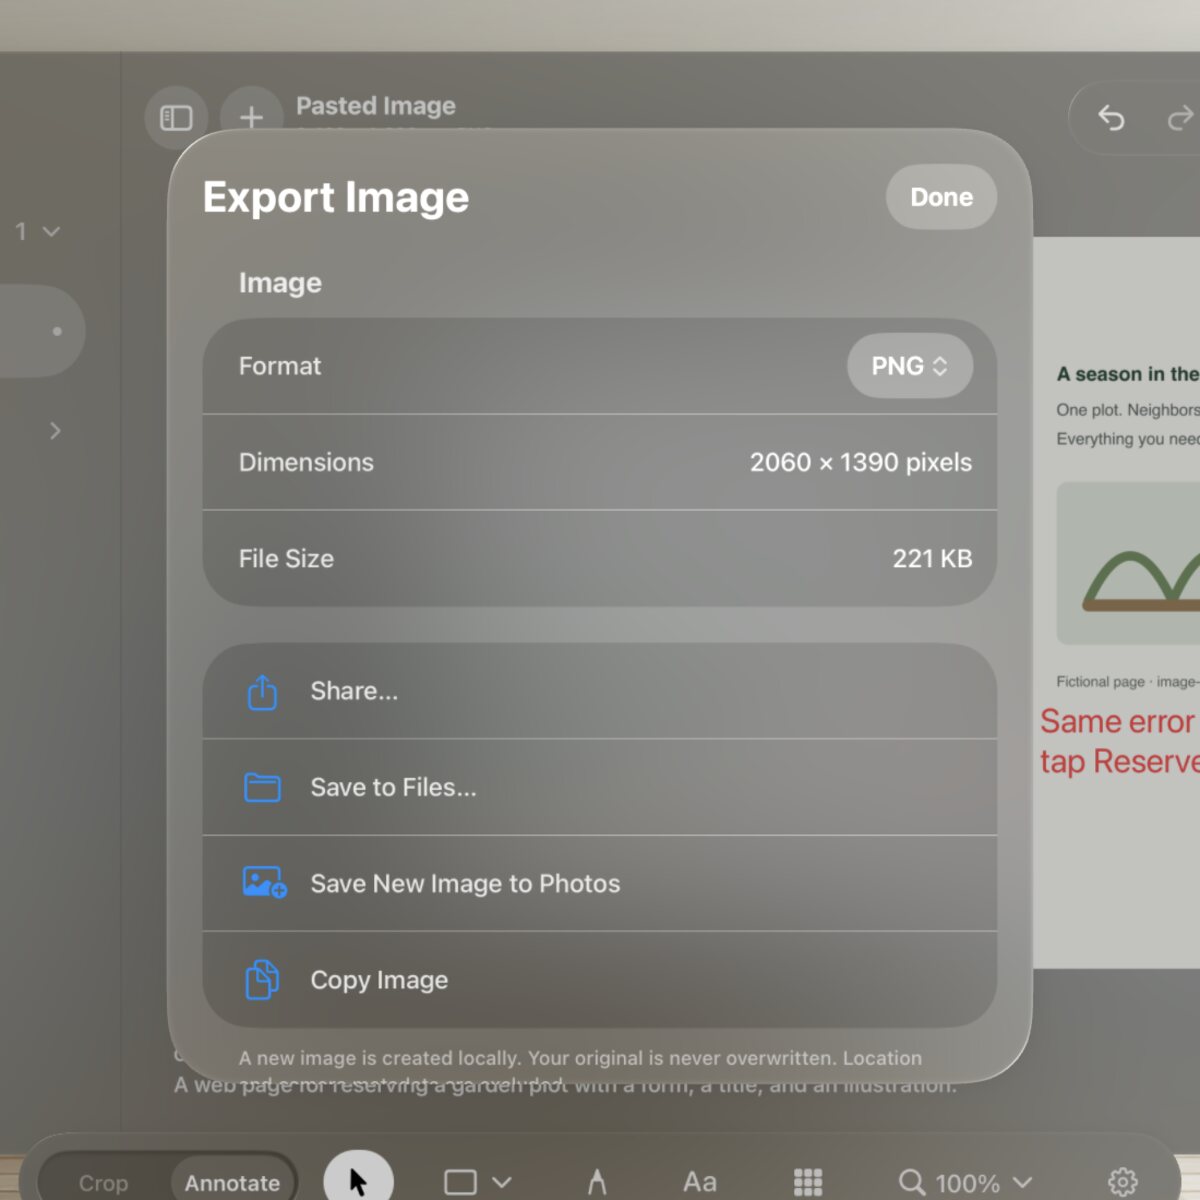
The buttons grouped at the top right do the sending. Each one makes a new image from your crop and annotations; your original never changes.
- Copy puts a PNG on the clipboard, the same as Share › Copy. You can keep editing while it works; “Copied” appears when it’s done. Then paste it into a chat, a note or an email.
- Share opens Apple’s share sheet with a PNG.
- Export lets you choose PNG or JPEG (with a quality from 10% to 100%; JPEG has no transparency, so transparent areas turn white), shows the size in pixels and bytes, and has Share…, Save to Files…, Save New Image to Photos and Copy Image.
New images carry no location or camera details from the original. Wide-color screenshots and colors stay wide-color (Display P3); everything else is standard sRGB.
Several images, and Recents
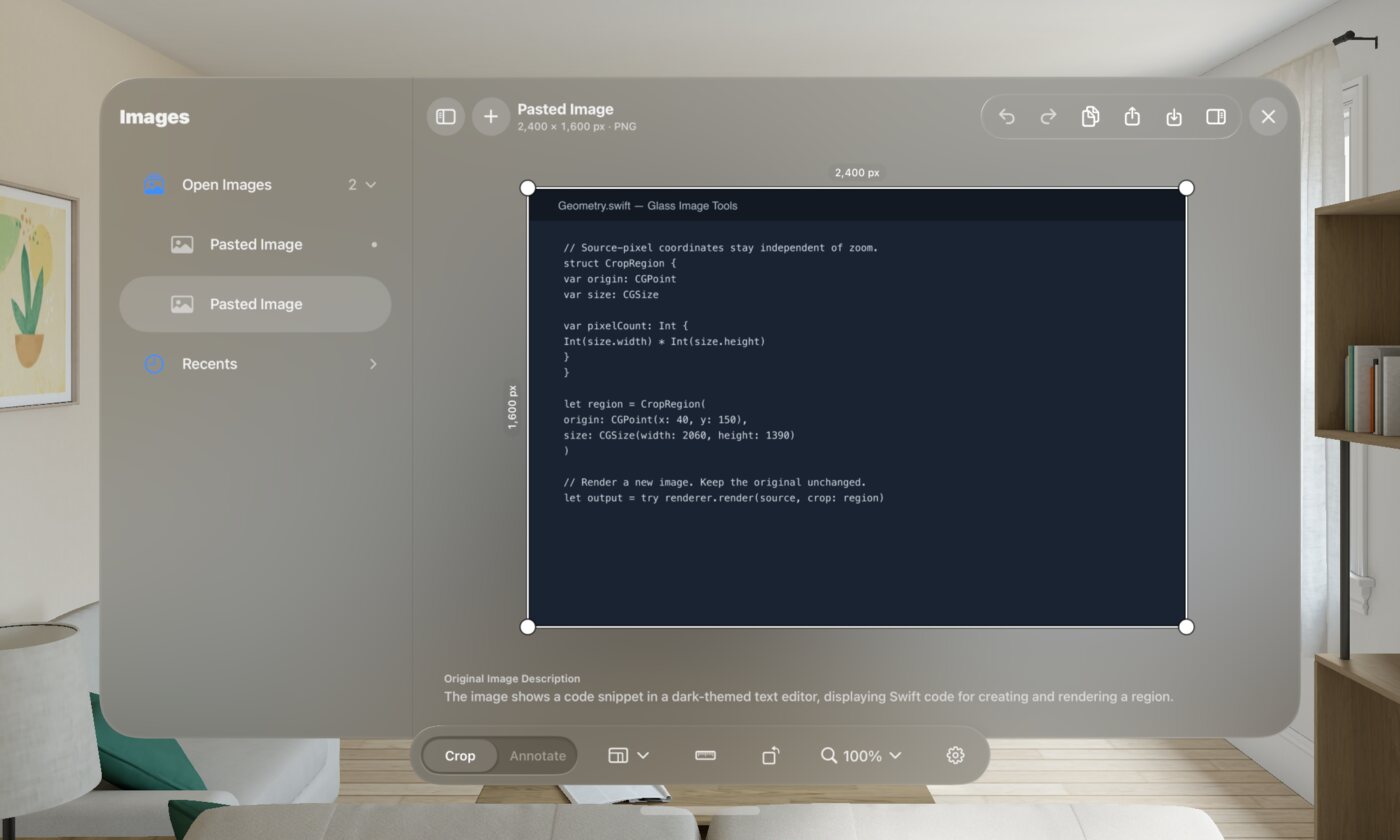
The Images sidebar on the left groups Open Images and Recents with symbols and counts. Tap a category row to expand or collapse it, then tap a compact image icon and filename to switch. Native List controls supply selection and hover feedback; Recents starts collapsed. Each keeps its own crop, annotations, Undo and zoom. The button at the top left of the editor shows and hides the sidebar.
The × in the window’s top right corner closes the current image. If you’ve changed it, you’re asked whether to Save a Copy, Discard Changes or Cancel. Closed images go to Recents, so you can open them again: as the copy you saved, or as the original if you discarded your changes. Recents last until you close the window or choose Clear Recents. A window holds up to eight open images.
The description under the image
On visionOS 27 or later with Apple Intelligence turned on, a one-sentence description of the original image appears under it, written by Apple’s on-device model. It’s there to help you find your place; it isn’t saved, and it isn’t part of anything you copy or save. If Apple Intelligence is busy or still getting ready, it appears when it can; on earlier systems, nothing is shown.
Settings and About
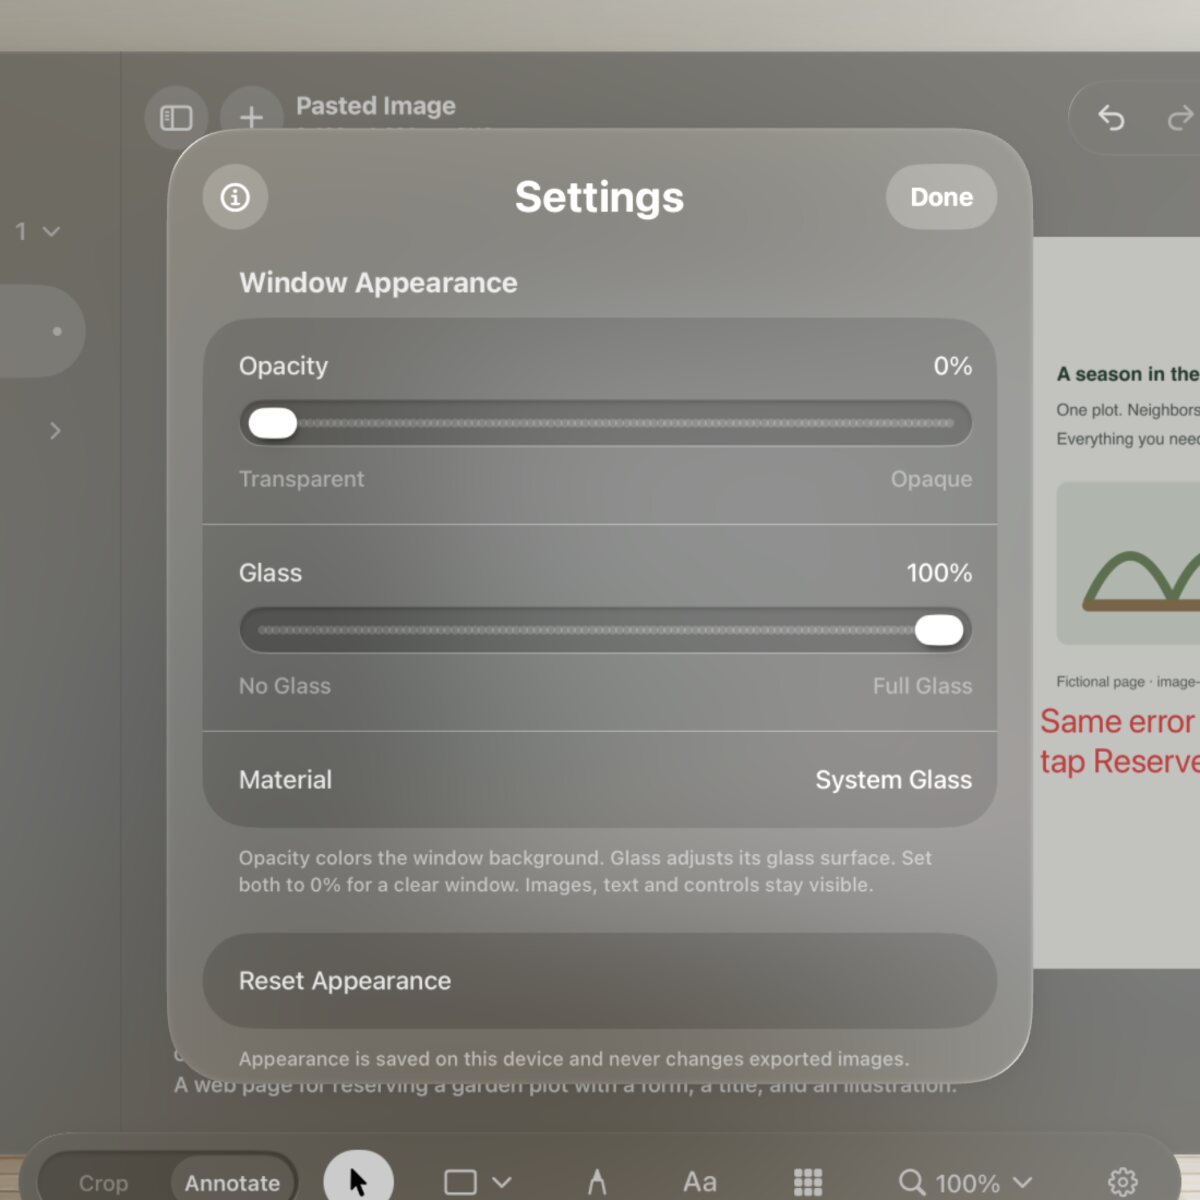
The gear at the right end of the bottom toolbar opens Settings. Opacity and Glass sliders set the window’s background, and a button resets them. They change only the window, never your image. With Reduce Transparency on in Accessibility settings, the window stays opaque.
The ⓘ button at the top of Settings opens About: which version you have, who made the app and why, and links to this site’s home, privacy and help pages, which open in Safari.
Keyboard
With a keyboard connected, ⌘ N opens a new window, ⌘ , opens Settings, ⌘ C copies, ⌘ Z and ⇧ ⌘ Z undo and redo, ⌘ + and ⌘ − zoom, and ⌘ 0 fits the image to the window. ⌘ V pastes an image in an empty workspace. Once an image is open, use + › Paste to open another. Text fields keep their normal Paste behavior.
When something doesn’t work
There is no image to paste
Copy an image in the other app, then use the empty window’s drop/Paste well, ⌘V there, or + › Paste. The menu’s native Paste control is greyed out without a supported image; the well reports a recovery message. If visionOS asks for paste consent, allow it to hand over that image.
“This image is too large”
The file is over 256 MiB or the image is over 200 megapixels, or a crop you’re exporting is over 100 megapixels. Crop it smaller, or open a smaller copy.
“These images exceed this window’s working limit”
The open images and Recents in one window can use up to 512 MiB. Close an image, or choose Clear Recents, then try again; or use New Window.
Save to Photos doesn’t work
The app needs permission to add photos. Allow it in Settings → Privacy & Security → Photos → Glass Image Tools. It only ever asks to add, never to read.
There’s no description under the image
Descriptions need visionOS 27 or later and Apple Intelligence turned on in Settings. If it’s still getting ready, the description appears once it can be made.
The app stopped opening after a week
Builds installed with a free Apple Account expire after seven days. Run it from Xcode again.
Removing it
- Save anything you want to keep: open images and Recents aren’t kept once the app is gone.
- On the Home View, pinch and hold the Glass Image Tools icon and delete it, as with any app.
On Mac, move Glass Image Tools from Applications to Trash; macOS may retain its sandbox container and preferences. On Vision Pro, deleting the app removes everything it kept. Images you saved to Photos or Files stay where you saved them. If you allowed adding to Photos, the permission goes with the app.
VoiceOver and larger text
The app uses Apple’s standard controls, which VoiceOver reads. Its own parts have names too: the canvas, the crop corners (“Top left crop corner”), and each annotation (“Arrow annotation”). Every button has a text label, and the pixel fields are spoken as “Width, pixels”. With the largest text sizes, Undo, Redo and Export fold into a ⋯ menu at the top, and the inspector puts each field on its own row.
What has been tested: Apple’s automated accessibility audits and the largest text size, in the simulator. What hasn’t: VoiceOver, Voice Control, Switch Control and Pointer Control on a headset. If something is hard to use with any of them, please say so.
Asking for help
Questions and bug reports go to GitHub issues. If you’d rather not use GitHub, write to msitarzewski@gmail.com. Please don’t attach screenshots with anything private in them; crop or pixelate first, which this app can help with. Security or privacy problems go privately instead, by email or as described in SECURITY.md.